I don’t usually screw up a life cast, but when it does happen, it’s only fair to share.
I want to do a series of posts on a project I am doing based on a vampire design a good friend of mine supplied me with.
Now, I am not a fan of vampires who cry about stuff, mope about looking miserable and look like they won’t tidy their bedroom. I want my vampires to look like they take your blood cos they CAN. So I am going to make one that looks like that. And Dave is the man to be such a vampire.
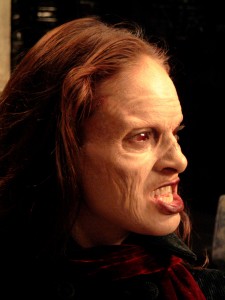
Mina Harker makeup for LXG. This was for Neill Gorton and I was helped in this speedy application in Prague by none other than Mark Coulier who - even though it wasn't his job - was happy to help me meet the crazy deadline.
I have only done one vampire in my life for actual an actual jobs – Mina Harker from LXG which was fun….but I want to do something utterly disgusting and frightening.
So I chose Dave. Sorry – not because he is utterly disgusting and frightening….no no no….but he has an expressive face and he is incredibly patient.
So naturally, I wanted a cast of a full head and shoulders which we duly did – the very capable Patt Foad and I set about baldcapping and bandaging the head as the pictures show.
I often use just bandage on the back of the head for a few reasons:
- There is no detail on there except wrinkled bald cap, so no need to waste extra alginate getting the detail of that only to shave it down later.
- It means the face is covered for less time, which generally is more comfortable for the subject, as they can see and speak while the back is done.
- It is easier to get off the head, as the two halves simply part easily. Much less chance of splitting the alginate.
It does mean there is a thin seam around the head but this is easily removed once the plaster is made, so that doesn’t present too much of an issue.
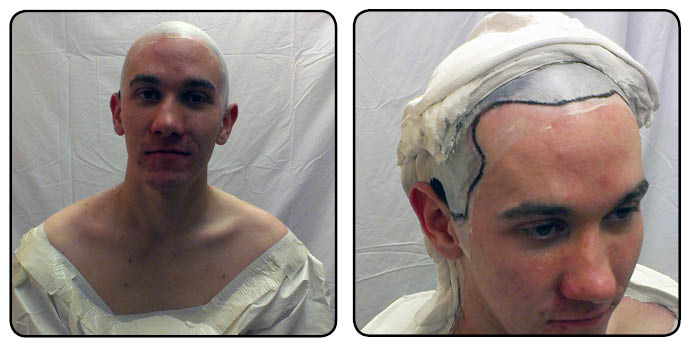
The front edge of the bandage is made into a nice chunky wall to keep it strong, and making it neat means the alginate we use on the face will butt up against it rather nicely. I use Nivea face cream on there as a release rather than Vaseline as it is much nicer to remove, and less greasy.
It is important to not make the bandage too thick, as it gets warm when it sets (after about 5 minutes or so). Making it four layers thick with a thicker rope or ‘rib’ around the edge keeps it strong while not being too thick everywhere. That black line you can see is Dave’s hairline marked with an eyebrow pencil. It will transfer onto the mould and onto the cast so we can mark the hairline for reference.
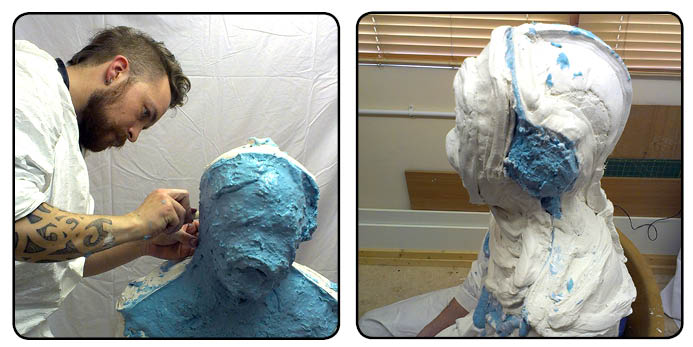
Patt goes to work cleaning back the alginate/bandage border. Note the ears are left uncovered by bandage, to help facilitate the removal round those pesky ears. These will be backed up with bandage once we reassemble the head - before we fill it with plaster!
Once the bandage is setup and some Nivea brushed over the edge (to help release it) alginate goes on the face. You may have heard of straws being used in the nostrils, but that is not something I would advise. If the straw get knocked, you’ll carve a groove into the nasal passage. It distorts the natural nostril shape and if it became dislodged during the cast, it would be uncomfortable….no…don’t do it!
Much safer to do the nostrils first while they can still see and swear at you, and then proceed to do the rest of the face in alginate, safe in the knowledge the nostrils and all their glorious detail have already been taken care of. Just have someone watching the nostrils the whole time that the alginate is still moving (in this case only about 3 minutes), and you should get a great cast of the nose and you won’t hurt your performer. Bonus.
Incidentally, I also do the bandage around the nostrils first too – that way they are the hardest part. When the front half of the mould goes down on a desk, it’ll most likely be the nose that hits it first so doing this ensure it it stronger than doing it last.
As soon as the bandage is set up (the last piece applied is allowed a few minutes to harden up just enough) we pop the head cast off. The back comes off easily first, and as this was done first, is also the hardest part and pretty stable. The front comes away okay, and I go to work filling the nostrils from the outside of the cast with abit of alginate. This is to ensure that the plaster we are about to pop in the head doesn’t leak out of the nose.
It is also the point at which I unwittingly ballsed it up, as you will see.
When putting the head cast halves together, you need to make sure they join up correctly, and that the two halves are secured using more plaster bandage to keep them there.
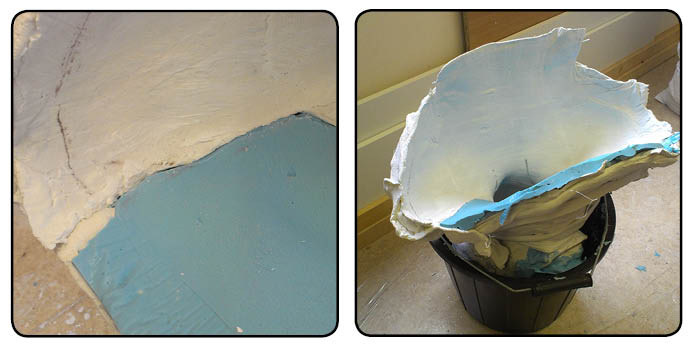
The pic to the left shows the nice join between the two materials - the plaster bandage back and the aginate front. To the right, the joined halves are placed in a bucket upside down, ready to be filled with plaster.
I filled the head with a mixture of a soft and hard plaster (Crystacal R and Fine Casting Plaster) so it was strong enough to preserve thin areas – such as ears – without snapping but soft enough for me to easily shave down the seam and air bubbles etc. I leave the head for four hours to harden up and then rush back to see how it went.
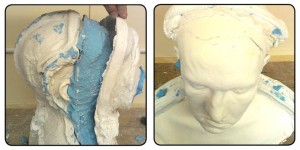
The head filled with plaster (left) opened up easily enough. Carefully removing the alginate from around the ears to ensure they don’t break. Ears are incredibly thin in places, and when made in plaster can break off if not careful. See how the nostrils and face has been pushed in and distorted on the left side as you look at the pic?
The ears are peeled off first carefully to make sure they don’t break…and if they did then at least keep the bits so they can be stuck back on again. Upon removing the alginate from the face, it is obvious that the nose area has been distorted by me filling the nostrils badly. Essentially, alginate crept in between the set alginate of the face and the bandage, causing it to lift away. D’OH!
I fume for a bit whilst checking everything else is okay. Annoyingly it is, removing the justification for a whole other head cast. I resolve to take another cast though, and because there is time to do it (and I don’t want to waste a lot of material) I think I will try and graft a new face cast onto the head rather than redo the whole thing.
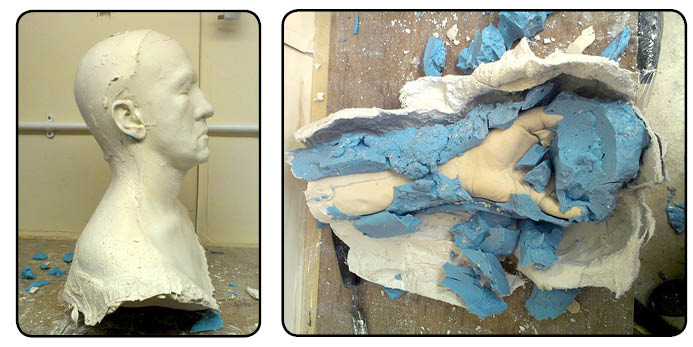
The minimal seam on the head was no problem. Just that sodding indented face. The hands came out fine...these were cast using a hard plaster to help the fingers not break off when taking the alginate off afterwards....a common occurrence when using a soft plaster. They can be reglued on, but who needs the hassle?
I will cover how this went in another post soon. I am still working on it, and will show you the whole process – good and bad.
Happy life casting!
-Stuart

Really appreciate you posting things like this Stuart. Good to know even pros mess up.
Is that mouldlife alginate? Every time I use it, its white but every time I see photos of other peoples alginate, its blue. Very confusing as all 4 bags I’ve ever used, stayed white.
They make a slow set which is white, and the standard set is blue I think. Also, like cars, the colour is just an addition which doesn’t affect performance.
-Stuart
some great tips….life casting going wrong is a real shit that you salvaged it shows us your a master of the craft. great post stuart