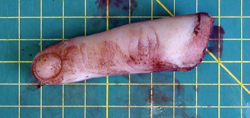
Realistic severed finger

Make this finger – about an hour of work with silicone and gelatine!

A little job cropped up for fellow makeup artist buddy Jennifer Nash requiring a severed finger.  I’d said I would help on the condition that she let me video the process and turn it into a tutorial.  So here we are!

For speed and accuracy, frankly it is easier and quicker to simply make a mould from the real thing, so I life cast my own finger using Life Form life casting silicone from Mouldlife. It only took about ten minutes to set up fully, and was easily removed.

I then swilled gelatine into the mould to make sure no air bubbles were trapped in there.  Then, topping it up to the brim, this fella can sit in a freezer drawer for a half hour while I kill Jar Jar with the kids on Star Wars Lego for the Wii!  (They’ll never understand my pain!)

Once the gelatine has cooled and solidified, out it pops to be worked and widdled to create a meaty end-stump and some carefully placed blood.

Materials needed:
1. Life Form
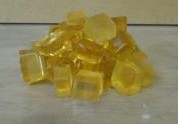
2. Gelatine FX Nuggets
3. Skin Illustrators/alcohol activated makeup palettes
4. Fake blood
(Mouldlife: http://www.mouldlife.net/index.asp)

5. Metal sculpting tools
(Tiranti: http://www.tiranti.co.uk/)
(Potterycrafts: http://www.potterycrafts.co.uk/)
(Compleat Sculptor: http://www.sculpt.com/)

Seriously – make five or six, chopped at different length and string them into a threaded necklace and see if it helps you when you next go grocery shopping.  If you do, then take a pic and send it to me….I’ll post them on the blog! mail@learnprostheticmakeup.com

Happy stumping and Merry Christmas!

-Stuart


All material, images and text © Stuart Bray 2011

Posted in Uncategorized | 24 Comments

Making your own FX grade gelatine

When I did the Coraline videos, I used pre-made gelatine blocks and so this video is here to correct that!

Gelatine blocksMaking your own gelatine blocks is easy with the right materials.  Food gelatine – the kind in supermarkets and general stores – is not really strong enough.  It will make a gelatine block, but won’t stand much punishment and wear, and melts easily.

Gelatine is graded in strengths by a rating system known as it’s ‘bloom’, and the higher the number, the stronger te gelatine will be.  This stuff from Mouldlife is 300 bloom, which is ideally the strength we need.

The other ingredients are sorbitol and glycerine (aka glycerol), used as food sweetener and sugar substitute.  These are easily found from food suppliers and wholesalers, but very often only in huge drums.  Often these suppliers will not sell small amounts.  You may find a retailer or some supplier who has bough it in bulk and is retailing in the amounts required for a kilo of gelatine blocks, it all depends on where in the world you are and what is available to you.  I am in the UK and got everything from Mouldlife as it was easiest to get all the ingredients in one box and pay one delivery charge.

Also, be aware that most FX gelatine is pork based, made from collagen found in skin and bones.  However, it is quite a cheap material (and reusable – just clean and remelt it) and a good value alternative to silicone for learning and low budget jobs.

Anyway, here is the video…please leave a comment!

Happy sticking

Stuart


All material, images and text © Stuart Bray 2011

Posted in Uncategorized | 36 Comments

Torn Face Zombie

Torn face applianceTorn Face Zombie – simple & cheap!

Halloween is almost upon at time of writing, so I thought it was high time I do a video tutorial to celebrate.  With just a few simple materials, this little beauty could be lumbering down your street soon.

Zombie walks, parties and just plain silliness sometimes require an extensive makeup which doesn’t cost a lot of money – something more than paint, powder and pus but which does not require a Hollywood (or, more likely, a Watford) FX studio either.  Hopefully, this will bridge the gap.

Incidentally, there is a well known design dictum which I first saw pinned to the workshop wall a few years back on a movie we were working on.  It had a triangle, and the words “Good – Quick – Cheap” written at each corner.  Underneath this it said “Pick two – you can’t have all three“.

I don’t know who came up with that, but it absolutely holds true.  If something is required to be good and you want it quick, it inevitably is not cheap.  If you want it quick and cheap then it probably wont be very good.

Well this makeup effect is good and cheap, so the price we pay is time.  Give yourself a couple of days drying time to make this.  The actual labour time is pretty small – I spent probably an hour making this in total – but you will need two days (or a Texan night) to get this fella dried up properly.

Check out the video below and please comment and click the like button in YouTube if you do indeed like it.  Be sure t0 get the free workbook download too so you can refer to it later if you plan on making this thing and if you do…please send me pics!

I would love to do a post on the results!  My email address is mail@learnprostheticmakeup.com.  Go on…do it do it do it!

Zombie thumbs up pic


Happy zombification!

-Stuart


All material, images and text © Stuart Bray 2011

Posted in Uncategorized | 19 Comments

What is the best way to learn makeup effects?

What is the best way to learn prosthetics and makeup effects?

This is one of the most common questions asked, so I figured a frank and honest post dedicated to it would be worthwhile.

First up, lets be clear.
Makeup courses are not the same as apprenticeships which, sadly, are almost non existent nowadays.  Apprenticeships in a makeup department were not easily found but were long term, studio based affairs.  It meant that a trainee makeup artist spent a long time honing their skills gradually in the job under supervision of a working makeup artist.

Makeup effects were part of the job done by a makeup artist who also learned hair, straight makeup and consequently were just a part of a much more thorough training.  You learned and worked in the real environment and you sank or swam – plain and simple.

Roll the clock forwards and the studio system has changed enough so that full time positions are no longer standard.  Almost everyone is a self-employed freelancer and makeup effects have become so sophisticated that they have separated into a different trade altogether which has spawned new training industries.

Nowadays it essentially boils down to three main categories of training. Education systems obviously vary across the world but the essence of these categories remain essentially the same.

  1. Academic or ‘certified’ qualification level
    (usually longer term)
  2. Private courses & tuition
    (usually short term)
  3. Self taught through books, DVD’s and online sources
    (usually long term & ongoing)

Which is best?  To be honest I think they all are able to do the job – but as you will see, there is a far more important element than where or how to train which has a much greater influence on the outcome of any scheme of education as you will see.  

Without it, all the training in the world means nothing.

____________________________________________

1. Academic/Certified Courses

These courses (sometimes up to degree level) usually offer full-time training over a long time period allowing a great range of material to be covered.

  • Usually run by big institutions, they are stable and secure learning environments, and teaching staff are accountable and usually very passionate about the subject. They may have large groups but usually have assisting staff to cope and often get guest lecturers to help support the learning.  Larger institutions are also more likely to have better disability support structures in place.
  • Sometimes prosthetics and makeup effects may be a small part of an otherwise exhaustive training programme with period, hair & wigs as well as fashion and skin care/cosmetology etc.
  • The course content may be associated with a much larger governing body which can make it a slow ship to turn around – can they respond rapidly to developments in materials and techniques?  It all depends on who actually gets to set and update the curriculum, and how much influence or approval they need to make the changes.
  • Also, if you need to travel or relocate to a good school, the longer duration of your travel or accommodation needs to be factored into the equation.  Two or three years of training gives you a lot of time to learn and practice, but you will need to support yourself during this time.  If you work, it will need to be outside of college time and not affect your studies.

____________________________________________

2. Private courses & tuition (short term)

Private courses are spared the red tape of larger institutions and can usually move more freely to accommodate newer techniques and materials.

  • They are not usually ‘certified’ by governing bodies and as a result are ships which can turn around much faster and respond to industry changes and developments. 
  • The perceived value of a lack of certification by a governing body can seem like a negative – yet the true measure of your ability will always be the standard of the work rather than a certificate.
  • This doesn’t mean every private course is any good or worth doing – it always pays to research.  Find out who is taking the class, what training or credits they have relevant to the field they specialise in.
  • Speak to current or past students and see what they have to say about their experience and give yourself time to weigh up the facts and feelings you accumulate from your research.  Be clear about what the course offers you and how it will deliver.
  • Private courses are not usually cheap but in exchange can supply intense, short bursts of training which are specific and very concentrated.  A lot can be learned in a short space of time and you will often have good student/tutor ratios and attention.  You also won’t need a long term relocation as with a long course, and you may be able to arrange a payment schedule to pay off the fees.
  • As private courses will succeed or fail on the intake of fee paying students, they need to be competitive and work hard to maintain their reputation.  Like I said, there are good and bad so make sure you visit more than one, get a feel for the places and consider what they can offer you.  
  • Sit in on some of a class if possible and watch how it goes on.  If you are going to be spending substantial amounts of money and time doing a course, it is not unreasonable to test drive the place for half an hour.
  • Lastly, make sure you look into the reputation and longevity of a place.  Research the history of the course or the people running it.  If you cannot find traces of the place or the people on the internet then be wary of how much they can help you.

____________________________________________

3. Self Taught (Books, DVD’s & Online)

It has been argued that simply spending the money and time you would spend on a course could be sunk into some materials, a good book or DVD and a couple of months of trial and error instead.

  • It may take longer, you’ll make mistakes and you may lose heart but you will also find out whether you really love it or not.
  • Would this act as a true substitute for a paid course?  It depends on your personality and how you learn best.
  • Far more important than what method of learning you use is your motivation for wanting to do it in the first place.  Simply put, you need to love doing it, and enjoy the processes – not just the end result.  

Without that inbuilt desire to do it, then being presented with the skills and techniques will not actually make any training worthwhile at all.

Like any career, there is the ‘on paper’ route but this must be supported by a realistic and knowledgeable approach to the industry to which it pertains.  By far, the best candidates I have seen are always people who just got their hands dirty and tried something.

Apprenticeships were granted and you were grateful to be on them – your position within it kept you on your toes as poor effort on your part meant you were out…just like a real job.  When people pay to do a course, there can be a feeling of attendee entitlement which isn’t conducive to the good work ethic essential for any professional career.

You see, there are plenty of people in the world who attend a course of some kind and expect the knowledge to pour itself into their heads which will make everyone beat a path to their door.  

That just isn’t a realistic expectation.

You can be ‘certified’ and ‘qualified’ by a governing body and still be utterly unemployable.  After all, it is not so much about being generically ‘creative’ or ‘artistic’ so much as being able to consistently function within a commercial industry.

  • Making prosthetics can be messy, smelly and often takes place in industrial units or workshops far from the supposed glamour of a makeup trailer.  If this kind of environment doesn’t float your boat then be warned.  
  • Makeup applications often start very early in the morning, can take many hours to do and may require you to get a to a freezing cold field in the middle of nowhere if that is the shooting location.

None of this is evident in the finished makeup, much in the way a delicious meal doesn’t reveal the skill, preparation, cooking and washing up afterwards.

And like a chef, you need to love food and cooking in order to do it well. You wouldn’t wait until you owned a restaurant before you started cooking – you would just do it all the time because it’s what you loved.

Many successful makeup effects artists working now are largely self taught, and this probably has more to do the pioneering ‘have a go’ spirit required to do that kind of work.

I think this single factor alone is the deciding element as to whether ANY kind of training will actually be worthwhile.  People who really love it will just start doing it simply for it’s own sake.  Because they loved it, they rode out the failures, practiced all they could, looked for all the information they could and gradually improved.

Over time they then built on that enthusiasm and plugged very specific gaps in their knowledge which they knew needed filling because they understood what was missing, and could then more easily seek it out from either a book, DVD, forum, person or course.

I care passionately about makeup effects (and so do those that actually do it) and I make no secret of it. The simple truth is that is no one right way – and even if there was (which there isn’t) it doesn’t necessarily mean that it would turn you into Rick Baker* or that you will be employable.

If there is someone who has been experimenting, practicing and trying stuff out for years then it is fair to say that they will be much more likely to succeed in the long run – and frankly they deserve to.  They will also be much more likely to appeal to workshop bosses who are themselves self motivated and obsessed individuals who worked hard to get to where they are.

If this isn’t a long run for you, then understand that there are plenty of people for whom it is and that gives them an edge that an expensive course simply cannot create.

*(Incidentally, if you have never heard of Rick Baker, Dick Smith, Steve Johnson, Rob Bottin, KNB, Caglione & Drexler, John Chambers, Steve Wang, Screaming Mad George, Kevin Haney, Stan Winston, Greg Cannom, Nick Dudman, Stuart Freeborn, Todd Masters, Matthew Mungle, Conor O’Sullivan, Mike Elizalde, Mark Shostrom, Christien Tinsley, Christopher Tucker, the Westmores, Gordon Smith or Neill Gorton (to name but a few) then I suggest a little research is required before spending a single penny on anything).

 All material, images and text © Stuart Bray 2011
Posted in Uncategorized | 18 Comments

Coraline Button Eyes Makeup Part 5: Application

Well, finally the last Coraline makeup video is here – and editing this made me recall how much fun I had sticking this thing on!

Paul Ewen who wears the piece is a joy to work with – he is no stranger to wearing prosthetic makeup and he really gets into character. If you’ve ever been accosted by a creature at a UK IMATS, there is a fair chance Paul was underneath the makeup and costume!

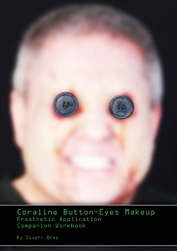
Coraline workbook cover

Click Here

I put together a free 11 page downloadable workbook for you to accompany this video.  Click on this link or the image to the left to go straight to it.

On there you will find a transcript of the voice over, step by step images and a list of the materials and suppliers I used.

That way, by seeing, hearing & reading the information, you’ll get as thorough an explanation as I can deliver without actually being in the same room as me!

Anyway, as promised here is video part 5: Application:

If you have any questions about alternative materials in your area, please get in touch. You will find an extensive worldwide supplier list in the first (and free) module of the Awesome Latex ecourse which is available here.

I also would like to mention I had help cleaning off the makeup by the delightful Hannah Keech – so Hannah & Paul – thanks for helping me out and for your patience.

Happy sticking!

-Stuart


All material, images and text © Stuart Bray 2011

Posted in Uncategorized | 10 Comments

Coraline Button Eyes Makeup Part 4: Casting Appliances

How best to get boiling hot gelatine into a mould without burning yourself to pieces?

The answer of course is a bloody great syringe which doesn’t melt under such circumstances.  Originally this video was gong to a couple of minutes long…and then I realised I’d best show how I made the syringe or else much of it would be useless.

So, please let me know what you think of this video – the most ambitious of mine so far. I dabbled with illustrations mixed with the video to try and best show various techniques in as simple-to-understand way as possible.  What do you reckon?:

I will get on with the final video on application as soon as possible. I am enjoying the process of making the videos and am gearing up for Halloween. If you have any ideas for tutorials you’d like to see then PLEASE do let me know so I can put it into action if possible!

Happy blood-slinging.

-Stuart


All material, images and text © Stuart Bray 2011

Posted in Uncategorized | 19 Comments

Coraline Button Eyes Makeup Part 3: Moulding

Part 3 arrives at last…a little redfaced and late for class but here none the less. Apologies for the lengthy delay but I am back in the house.

It has been a crazy month of working & vacationing in Texas with my family as well as finally getting a new computer (yay) which can actually render hi-def video and not crash taking a weeks worth of editing with it! Ouch.

Plus, my kids are kind of like mini terminators in Toy Story T-Shirts…”they absolutely, positively will not stop”…ever!  Still, as promised, please see below the third installment of the Coraline makeup process.  The next one (part 4: casting in gelatine) will be shorter and the application (part 5 – the final one) is gonna be juicy.  Now that I have kit that can handle the editing, I can get these out much quicker.

If you like what I did – and even if you didn’t – then please let me know.  You will help me get better at helping you, sorta thing.  *Group hug*

Happy carbon-fibre-ing (fibering)
-Stuart

All material, images and text © Stuart Bray 2011

Posted in Uncategorized | 9 Comments

Coraline Button Eyes Makeup Part 2: Sculpting

The second Coraline video tutorial is all about the sculpting side and I had fun doing it.

Please view below or on YouTube and check out the transcript below which may be of use to you if you are interested in certain aspects or if you just plain can’t understand my garbled mouth-noise of a voice!

(I hope you like Crazy Jazz.)

If this is interesting to you then please leave a comment!

Happy button-stitching!

-Stuart Continue reading

Posted in Uncategorized | 12 Comments

Coraline Button Eyes Makeup Part 1: Making Cores

This is the first video of the series taking a look at how the cores were made for the makeup.

It may seem that simply having a lifecast means that you can start cranking out appliances, but it is not as simple as that.

The plaster original is the master head, the one copy of the real thing.  Knack this one and you are buggered…no no, you’ll need to make a mould of this head so you can sculpt on a copy of the head.  What if you need three or four different makeups to be sculpted on the same face.  Or if you want some lightweight versions to stick appliances on for painting?

If you make a duplicate of a whole or part of something with a mind to sculpt on it then it is often known as a core becasue it will be the base shape onto which everything now happens.

Because you will be making a copy, you can also modify the shape slightly to make it better suited to the various moulding and casting processes.  That way you can include areas for keys, bolt holes or other enhancements.

If this does not seem too clear yet, it will make sense as the videos gradually reveal the complete story.

As always, I want to know what you think and how I can improve so please comment in the box below! Cheers.

Happy button-stitching!

-Stuart


All material, images and text © Stuart Bray 2011

Posted in Tutorial, Uncategorized | 22 Comments

Coraline-inspired ‘buttons’ – tutorials introduction

Button EyesI was inspired by the animated movie Coraline, and really fancied seeing what the buttons stitched in the eyes would look like first hand on a person.  This was my take on it.

Naturally I decided to document the process which meant it took longer to do than usual, but hey…you’re worth it!

I have shot everything in Hi-Def, and will edit the whole process into 5 separate videos, each one focussing on a different aspect in detail so you can see up close how everything was done.  I also use carbon fibre paste with epoxy gelcoats for the first time, so my moulds were (for me, anyway) a bit of an unknown quantity.

Anyhow,  please enjoy the introduction video showing you a taster of what is to come over the next few weeks.  If you like what you see, please let me know by commenting in the box below!  Cheers.

Happy button-stitching!

-Stuart

All material, images and text © Stuart Bray 2011

Posted in Uncategorized | 2 Comments