Anatomy of a wrinkle

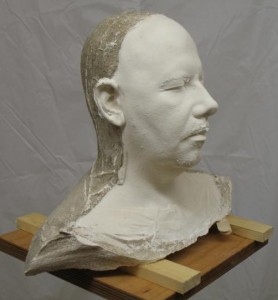
A scrunched up face. Mine, in fact.This post takes a look at creating wrinkles and breaks down a straightforward method which takes the mystery out of how to make them much more realistic every time.

You may want to create a subtle ageing effect or maybe recreate the Caglione & Drexler Pruneface makeup from Dick Tracy…either way, the principle is laid bare below.

And, yes. That is me I’m afraid.  My pirate alter-ego – cap’n Nohair – Aaaaarghhh!

What skin does
Skin stretches but it does not compress – instead it bunches up and creates folds. When you scrunch up your face and cause the facial muscles to contract, the area of skin that makes up your face is suddenly squished into a smaller space- inevitably creating folds of skin and wrinkles.

When creating prosthetics, it is often useful to take reference photos of the subjects face in a neutral, relaxed pose and also pulling a scrunched up smile, so those places where the skin bunches up become much more obvious and can be included in the sculpt to allow for better, more realistic movement.

When joints move, skin on one side of the joint is stretched, the other is forced to compress, invariably creating folds and wrinkles of varying degrees. The elasticity of the skin will dictate how smoothly it appears when it is again relaxed.   As the person ages, so their skin remains increasingly wrinkled as the ability of the skin to ‘ping’ back is diminished. I find as the ageing process works it’s magic on me, I become my own reference material.

(Yay – I win).

This is an important thing to be aware of in larger appliances or body suits. Usually the original lifecast of a body is made in a position with all the major joints semi-flexed so that the suit made on it does not need to stretch so much at the joints.

Imagine in the legs where cast straight, and when the final suit is worn and the knees are fully bent. The amount of stretch require on the front is huge, as would be the compression on the back.

How to create it

  • A wrinkle is a meeting place of two areas of skin, and the wrinkle is the result.
  • Sculpt the skin either side of the actual crease in order to arrive at a wrinkle.
  • Once these mounds of skin are blocked out, the line naturally occurs and can be hardened up using a thin tool or pin through plastic.
  • If you have a very flat area and try to create a wrinkle by just putting a line in the surface, you will most likely not create a wrinkle so much just as a line in an otherwise flat plane.
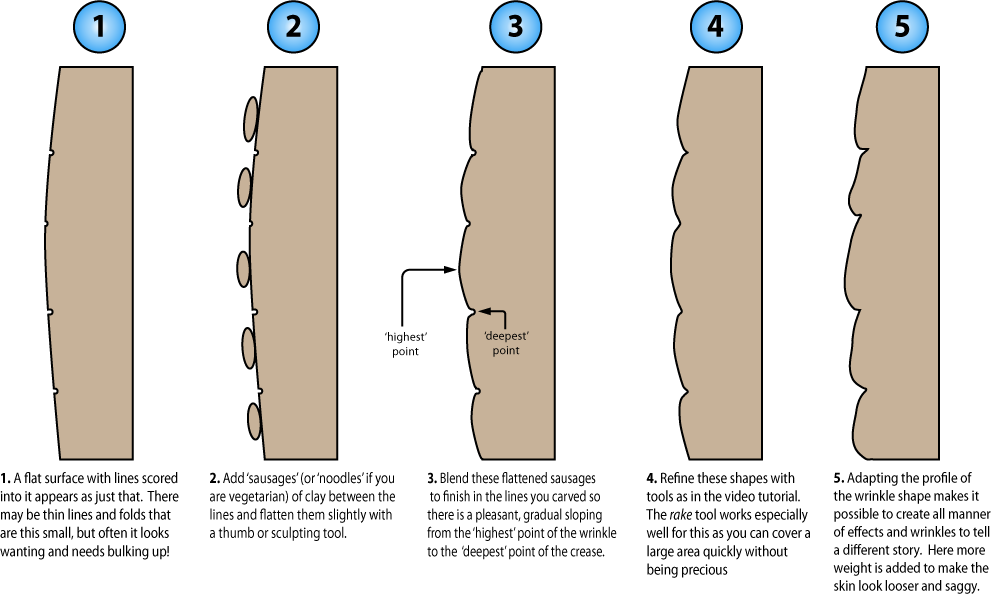
  • Check out the illustration below – if it is too small to read, just click on the image and it will open full size in a new tab for you.

Illustration showing a cross section of wrinkle sculpting method

Illustration showing a cross section of wrinkle sculpting method

Too see this in action, check my sculpting video part 1 (http://www.youtube.com/watch?v=66V7egZo308zip forward to 08:06 to see this method in action).  The wrinkle is by definition there because of the volumes of soft flesh either side of it trying to squish together, and it is these which need to be sculpted to get a wrinkle.

If you want the skin to appear thinner, it also helps to add a little more weight at the bottom of your built up mass to suggest gravity is working it’s little magic too!  Varying the profile of this wrinkle mass will give you a huge variety of effect.

==========================================
If you get stuck with any sculpting issues – just email me a pic and I’ll do my very best to help you out.  Please leave a comment or suggestion below – I would love to hear what you think.
==========================================

My bundles of joy

My bundles of joy!

I will be posting that Waking the Dead sculpt next – just in the editing phase now.  It’s been so busy, plus my kids are incredibly demanding – at the moment we are on half term so they are home and experimenting with ‘Daddy sleep-deprivation’ apparently.

They spend most of the day as the illustration would suggest.


Happy sculpting!

-Stuart

All material, images and text © Stuart Bray 2011

Posted in Uncategorized | 16 Comments

Prosthetic Sculpting Basics

Prosthetic Sculpting Basics

I wrote this as an intended post originally, then decided to do a series of videos based on it instead (Part 1 – Blocking out, Part 2 – Refining, Part 3 – Skin texture ), so consider this post a summary of the tutorials.  Reading and watching the information helps retain it and also can be printed out as a handy guide.

Sculpting is one of the most creative aspects of  prosthetics and is fun to do.  The best thing is that to practice, all you need is a cast to work on and something to sculpt with.  You don’t need to mould everything you sculpt…just sculpt something, photograph it and then reuse the materials.

This is an economical way of learning, as well as building up a portfolio of sculpts which you can review later and seek advice without cluttering up your home with dozens of delicate sculptures.

For the purposes of this post, I am assuming all sculpting will use plastiline rather than a water based clay.  This is simply because plastilines are oil based sculpting mediums which do not dry or shrink like water based clays, and achieve a greater level of detail.  Lighter fluid (naphtha – the kind used in Zippo lighters) is usually the solvent used if any as this is relatively easily sourced and stored in a workshop or tool box.

loop tool pic


1. Reference
If possible, use reference which is as close to the look you want first and use this to inform your sculpt.  Getting a general feel for what you want before you pick up any clay is usually time well spent.  It will get your juices flowing and inform your brain as to what shapes you should be looking at.  The more you look, the more you will see.

2. Design
If you are creating a sculpture that uses wrinkles or another sculptural device (horns, warts, scales etc), it pays to vary them in intensity and regularity.  If they are too similar and all over the sculpt, they will have less impact than a few good, well placed ones.

3. Sketch out boundaries and detail
I like to use a pencil to mark out where the sculpture need to finish, such as around hairlines, ears and lips etc.  This gives you a specific point at which the plastiline is going to stop and real skin will begin.

Also, if you intend to keep any of the original wrinkles and folds of the skin in the sculpt, it helps to mark these out too.

4. Block out
Start by putting small blobs of plastiline onto the surface and be sure to press them firmly to the surface and making them flat.  It is usually a good idea to keep a minimum thickness of 2-3mm and flattening the blobs like this as you go will ensure that this thickness is maintained.  You can always carve in or add more later.

Work sausage-shaped blobs around any main wrinkles, folds and lines you wished to keep so that as you build up over the surface you do not obscure their position.  Blend these blobs together – except those you wish to keep as wrinkles in the final sculpt – using a small tool or your fingers.  These lines can be left intact and worked on later.

Often it is desirable to retain the position of the original wrinkle in the skin underneath as this is the natural place for the skin to compress.  Doing so will ensure that the appliance folds in the same way and works with the skin better, creating more natural movement.

Build up the larger forms and establish the gross, overall shape or ‘form’.  It does not need to be particularly neat at this stage – we are concerned now only with the rough shape and form.

5. Refine techniques
Once the bulk of the shape is there, it is time to refine the form and surface.  For this, I like to use serrated tools such as a griffon hook or loop tool.

These loop tools comes in many different forms and can be bought although many sculptors make their own using piano wire, guitar string or fret saw blades. (click here for my tutorial on making your own loop tools).

The surface can now be gradually shaved to a more organic, coherent form which appears to flow gradually from one form to the next.  This essentially is what all appliance sculpting is – placing blobs of material in the right place and blending them together so they look like one, continuous surface.

The serrated tools work best as they gradually shave small amounts of material without drastic scoops being hacked away.  By varying the pressure, you can shave down the edges to a natural taper, so they arrive at the skin at an angle which does not suddenly shift from one to the other.

As you refine, you can reduce the pressure to make finer and finer tool marks. I also recommend working the tool in one direction, and then across it the other way to ‘cross-hatch’ the marks.  These finer tool marks can be smoothed out with the thumb as the amount of material you are moving around becomes less and less.

Surface rakes pic

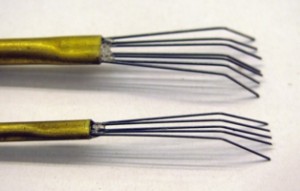
Surface rakes made from piano wire & brass tubing

Using a surface rake of some kind to gently score tiny scratches in to the surface will help smooth out the finish in a very natural looking way.  The tiny lines need not be deep as you use use minimal pressure – the effect comes from multiple passes which gradually smooth out the surface.  The long prongs act like a kind of suspension, rising and falling with the undulations of the surface, so the scratches are not deep.


6. Texture techniques
Good texturing is of course important, but should not begin until the form is correct – think of it as putting really good wallpaper on wobbly walls.  You need to get the surface right first, then tinker away with the pretty texture afterwards.

What is the difference between ‘form’ and ‘texture’?  Well, if you were to manually focus a camera on the final sculpt so that the image you saw was slightly blurry then what you are looking at is the form.  Focusing  the image until it is pin-sharp will then reveal the texture.

What the final texture is to be is down to you and your  design, but commonly required textures include skin pores, wrinkles and other fleshy, non-descript textures.

Using a small, reticulated foam sponge (commonly known as a black ‘stipple’ sponge or scott foam) through thin plastic film such as sandwich wrap works well.  It creates a good non-specific skin texture quickly.

Tooling (literally, gently creating texture by using sculpting tools directly) through plastic of varying thicknesses can create good little wrinkles, folds and pores.  Usually use thin bladed tools, small loop tools or even pins for this.

2 simple tips to help you
Using lamps and light
It is crucial to have a strong source of light such as a lamp nearby to throw strong contrast over the surface.  This will reveal lumpy or unintentional unevenness in the surface in a way that ambient light will not.  If the sculpt is small enough, move it around and take it into different lights and even outside if possible. 


Look at it in a mirror
Another good thing is to look at the reflection of the sculpt in a mirror, especially if you are making something  symmetrical.  Errors in symmetry can evade your detection as you become accustomed to looking at your sculpt.  By viewing  it in reverse you may be surprised to see just how out you are.

Use this as a rule-of-thumb guide, but really nothing will beat just getting stuck in – grab some plastiline and get your hands dirty.  Reading about sculpting will inform you, but enjoying putting it into practice is the only way to actively see any improvement in your ability to actually do it.

If you would like some feedback on your sculpts or just want to share what you have done, please feel free to get in touch.  Let me know what you think and leave me a comment below!

Happy sculpting!
-Stuart

All material, images and text © Stuart Bray 2011

Posted in Sculpting, Tutorial, Uncategorized | Leave a comment

Prosthetic Sculpting Video Tutorial Part 3: creating skin textures

Prosthetic Sculpting Video Tutorial

Part 3: creating skin textures

Baby-StuHere is part 3 of the basic prosthetic sculpting series.  I now need to start another and apply these techniques to a design.  I have one planned, I have booked the model and I shall be doing something creepy and weird.

(A makeup, I mean.  Not creepy and weird like wearing a giant baby costume while shopping. And before you ask, it’s a safety pin, okay!).

As ever, I would love to know what you think – please leave a comment (good or bad) and help me make the stuff better for you.

Happy sculpting!

-Stuart

All material, images and text © Stuart Bray 2011

Posted in Uncategorized | 5 Comments

Prosthetic Sculpting Video Tutorial Part 2: refining the surface

Prosthetic Sculpting Video Tutorial

Part 2: refining the surface

Here is part 2 as promised…took a little longer because, well, the weather here has been astounding and my kids can make a bowl of cereal last for 14 hours of jumping around and screaming.

Frankly, I’m surprised I managed to do it as quickly as I did!

As ever, I would love to know what you think. Please leave a comment either below or on YouTube or even email me direct!

Comments arrow pic

Happy sculpting!

-Stuart

All material, images and text © Stuart Bray 2011

Posted in Uncategorized | 2 Comments

Prosthetic Sculpting Video Tutorial Part 1: blocking out

Prosthetic Sculpting Video Tutorial

Part 1: blocking out

Well this is fresh off the press…just edited part 1 and working on the next couple.  I will get them up here asap!  As ever, I would love to know what you think.  Please leave a comment either below or on YouTube or even email me direct!

Happy sculpting!

-Stuart

Posted in Uncategorized | 3 Comments

Sculpting Tools For Prosthetics

Sculpting Tools For Prosthetics

Sculpting toolsSculpting tools are many and varied.  I have bought  – and made – a fair few too many over the years simply because I like them.

However, there are only really a few sculpting tools that you need despite all the choice available. Here I cover what you will actually want to simply start sculpting.

Tools are used to perform four basic tasks:

  1. To add stuff
  2. Take stuff away
  3. Move stuff
  4. Make marks in stuff

Some of this can be done with your fingers, but often you need something harder to bully the plastiline into the shape you want and get a wobbly-free surface.  Most prosthetic sculpture is done using an oil-based clay known as plastiline rather than a water based clay (such as a potter would use).

Many of the tools used in sculpting prosthetics may be found in an arts & craft suplliers or maybe a potters supplier, but some are found only at sculpture supply stores.  It may be that you need to shop around and many have websites.

The tools described here are the smaller versions for sculpting prosthetics, but they are usually available in larger-scaled sizes for bigger work.

____________________________________________________

Wooden tools

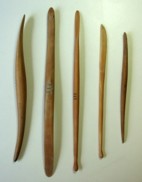
Various wooden sculpting tools

Various boxwood sculpting tools

Usually have shaped ends to provide more scope for leaving marks in the material.  The kind I prefer are simple boxwood tools with a flattened, rounded ends.  Some have rounded, ball-type ends which are useful for interior hollows such as nostril and ear shapes. The flattened ends are handy for pushing wrinkles and lines into plastiline.

Wooden tools are easily re shaped and repaired using a sharp craft knife and wet or dry paper should you accidentally snap the tip off.  It is a good idea to treat wooden tools with a preserving oil such as linseed oil, as the dry wood can stick to clays and stain easily.  I will cover care and repair of tools in a future post soon.

____________________________________________________

Loop tools

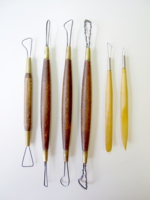
Loop tools pic

Various loop tools

Loop tools are quite simply a loop of metal held in a handle, and there is great variety of what manner of loop to have in the handle.  Usually they consist of a simple loop of round, hard wire such as piano wire.  This does a great job of cutting out little scoops of material.  However, this can be twisted to produce a more abrasive surface which can ‘rake’ the plastiline gradually.

A thin saw blade such as a fret saw makes a great little rake for larger areas, and bound bass guitar strings work well for finer stuff.  (Click here to download the free tutorial 0n how to make these.)

____________________________________________________

Griffon hooks

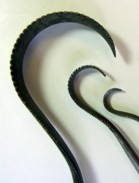
griffon hook tool pic

Griffon hook tools

These little tools are great for carving imperfections out  of plaster lifecasts as well as sculpting.  The smaller versions are great for shaping and reducing, particularly for concave shapes which are harder to work otherwise.


____________________________________________________
Steel tools – dental & wax

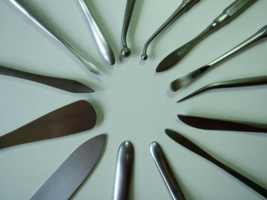
Various metal tools pic

Various metal tool - dental and wax working tools

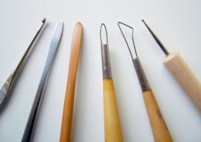
These little tools are great for making marks in the surface, such as pores and little dents.  They are usually a little more expensive than most tools simply because they are stainless steel but are useful for working into plaster lifecasts as well as plastiline.


Wax tools are similar to the dental tools, except they are not usually stainless steel, so are susceptible to rust and tarnishing.  They are usually heated over an oil lamp and used to work wax models for sculptures intended to be cast in bronze.  The thinner bladed tools are great for thin lines and creases, and the pointed tools make excellent pore texture.

____________________________________________________

Surface rakes

Surface rakes pic

Surface rakes made from piano wire & brass tubing

These are usually home made but you can usually find the bits easily enough.

They are used to create a smooth, unified finish by gently dragging and scratching thin lines into the surface of the sculpt, just before you texture.

These are made from thin lengths of piano wire and then crimped into the end of some brass tubing as a handle.  You can use a tuft of wire from a wire brush to do something similar, but I will cover making these in another post soon.

Most of these tools are not that expensive, only the stainless steel tools which are shiney and nice. (Hmmm – shiney!)  These are more of a luxury item though, and you can certainly get by with just a small wooden tool, a small wire loop and either a bass guitar string tool or a little serrated tool such as a griffon hook to help refine.

A few good suppliers that I have used include: 

UK based suppliers
Alec Tiranti (http://www.tiranti.co.uk/)
Potterycrafts (http://www.potterycrafts.co.uk/)
Mouldlife (
http://mouldlife.co.uk/)

USA based suppliers
Compleat Sculptor (http://www.sculpt.com/)
SculptShop.com (http://www.sculptshop.com/)
Sculpture House (http://www.sculpturehouse.com/)
Wayne The Dane (http://www.waynethedane.bizland.com/)

This is by no means a comprehensive list – there are too many all over the world for me to list here.  If you want to check out more, Google ‘sculpture supplies‘, ‘clay sculpture supplies‘ and ‘pottery supplies‘.

If you are having a tough time finding a supplier or want more advice, please feel free to leave a comment below or email me and I will do what I can to help!  If you know of a good supplier that I should include here, let me know and I will add it to the list.

Comments arrow pic

Happy sculpting!
-Stuart

All material, images and text © Stuart Bray 2011

Posted in Uncategorized | 18 Comments

Behind The Scenes of Waking The Dead

BBC’s Waking The Dead – Behind The Scenes of Prosthetic Makeup Application

The Bleeding Knife tutorial was based on a gag for a scene in the BBC TV show Waking The Dead which I did last year, working for a fantastic FX guy Waldo Mason who did most of the stuff for the show.  Working with him & Viv Riley, the series makeup designer was a lot of fun, and I extend my sincere gratitude for the job.

The BBC have also just released a short ‘making-of’ video featuring the application of  drowned corpse makeup I made for the show, and I thought it would be cool to post it here.  Thanks to Ed for doing a great mould and for helping with the application – you rock!  Check it out and let me know what you think!

Please note: This clip may not play if outside of the UK owing to the BBC licencing laws and stuff.  If so, apologies – out of my control but will be posting my own pics in due course once the show has aired!

(UPDATE April 3rd 2011: The show aired part 1 today, and on April 4th part 2 will be on.  I will put something together and post ASAP!)

———————————————-

———————————————-

Please feel free to comment in the box below!

-Stuart

Posted in Uncategorized | 6 Comments

All about…edges.

Creating good edges is kind of like personal hygiene…
if you do it properly it goes unnoticed.

Smelly Dude PicIt’s only when you stop washing that it attracts any attention!

Thus, by definition ‘ good’ edges are not noticed – if you do a good job of blending them, then they are not there to be seen.

This post is inspired by a great email I had from someone who emailed asking how one gets great edges on a prosthetic.

I love this kind of question because it is simple, direct but makes me really think about the answer.  After much deliberation, my answer to you, Howard, and anyone else who is interested in great edges on prosthetics is in this post!

===============

The point at which a prosthetic appliance stops on the skin creates an unavoidable edge (if it does not then it is not a prosthetic any more, but a mask!) and the ideal situation is to blend that edge to nothing so you can’t see it.  That is where 99% of all prosthetic issues occur once the thing is applied.

Getting a flawless blend between the ‘fake’ of the appliance  and the ‘real’ of the skin is where most of the work is in prosthetic makeup.  This can be hampered by an unintentional thicker edge and a noticeable colour difference between the skin and the appliance after application.

Whether visible edges are important or not depends on what the makeup is for.  If the makeup is for a theatre production for example where close scrutiny is not so likely, then less than perfect edges are not so much of an issue.  However, most situations require for the best blend possible and that is what we are concentrating on here.

For great edges that need to get close to a camera lens, here are the things that need to happen to get great blending edges on appliances…

  • Start with a good lifecast

Fresh plaster lifecast

Fresh plaster lifecast straight out of the alginate. Despite the mess and slight imperfections, this cast had no distortions!

If making a custom appliance, you need to get off on the right foot, so to speak.

It needs to be an accurate copy of the original, without distortion, major air bubbles or serious imperfections.

Small air bubbles etc can be filled and the seam line can be shaved down.  However, large discrepancies are harder to fix and may require a re cast!


  • Make sure your sculpted edge is tapered well.
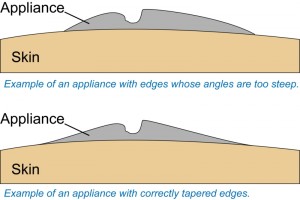
Edge tapered angle

This illustration shows how a rapid or steep angle will be obvious on skin, where as the gentle taper naturally blends into the skin.

Ensure the form of the sculpt shifts naturally to the surrounding anatomy

of the skin surrounding it.  Match the texture of the surrounding skin right up to the edge.

The illustration to the left demonstrates how the angle of the appliance approaching the skin must be sculpted to taper naturally.
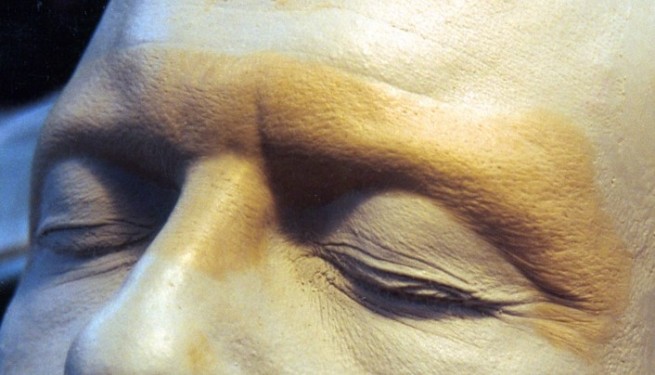
 

Forehead sculpt

Forehead sculpt for a TV show. This appliance was very thin, and the edges blended nicely into the existing forehead.


  • Decide where to put your edges carefully.

Consider carefully where exactly the edge finishes.  For example, if a cheek appliance is made a little larger so that the bottom edge finishes beneath a jawline where it is less noticeable. In fact sometimes you may need to…

  • Make a larger appliance.

Larger scale prosthetic makeups were often broken down into smaller, overlapping appliances.  This was a technique developed by Dick Smith to counter the shrinkage that occurred with Foam Latex, the main appliance material of the time.

Nowadays, almost all large scale prosthetics are achieved using silicone which does not shrink – quite the reverse, actually – and consequently larger, single appliances that cover more of the face or even a whole head or body part have come back into use.
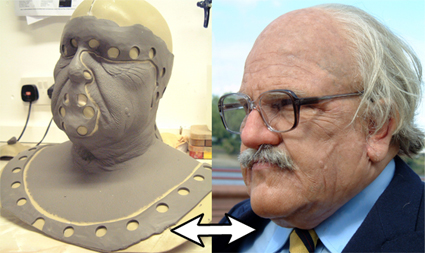
Dom Joly Makeup

This silicone makeup used a large wraparound face appliance with seperate forehead, nose and ear appliances. The appliance around the face could have been made from smaller overlapping pieces, but I wanted to reduce the amound of blending edges.

This technique requires more skill to handle such a large appliance but can cut down application time considerably.


Edges can finish under costume or the back of the neck and there are fewer of them.


Not all situations warrant a huge appliance, so this needs to be weighed up and a balance struck.

  • Make a great mould.

A good mould is essential, so that you get an accurate copy of the sculpture in reverse.  In the case of a two-part mould with a core and a mould, the two must fit together perfectly, with no warping or distortion of the two parts to fit together.  Making sure any location keys work properly and avoiding undercuts is important too.

  • Cast good appliances from your good moulds.

Casting well from your moulds is also important.  No good having a great, accurate and durable mould and then not actually getting a usable appliance out of it.  Carefully getting the appliance out of the mould (de-moulding) is also an important skill to avoid damaging the edges.
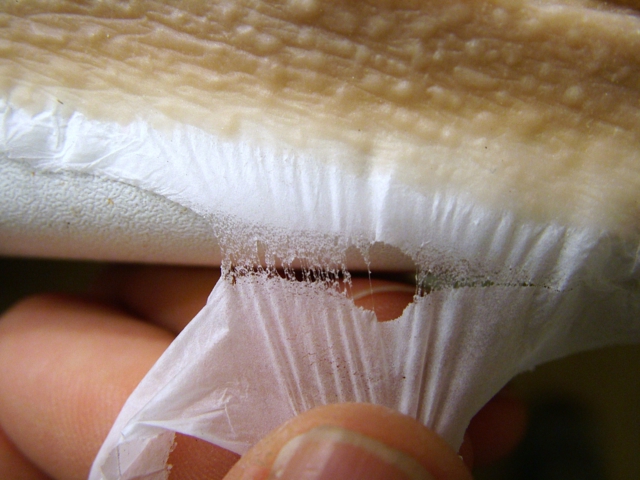
Thin edges on silicone appliance pic

This image shows just how thin a thin edge can be. An appliance with an edge like this is a joy to apply once you know how. Notice how it is all but separated from the excess (or 'flashing') by a cobweb-thin membrane.

Often, an edge known as flashing will still be attached by a thin membrane (see image above – also note how the skin texture and bumps etc go right up to the edge as mentioned above).   Preserving this edge until the last possible moment before application will enable you to handle the piece for painting or even application.  This will reduce damage to the ‘live’ edge (the actual edge that will finally be applied to the skin and blended) before the piece is needed.

  • Stick it on right.

Good application is essential as you can obviously make a bad job of applying a great prosthetic.  If the super fine edges necessary for a natural blend should roll under themselves or get stuck badly then it will need to be fixed so the edges are not obvious.

Fine edges by their nature are beautifully thin but also difficult to handle and are easily damaged.  I once had a makeup artist complain that the edges were too thin and she could not actually apply them. She was complaining that the edges were too thin which is precisely what you need to get a great blend.

This incidentally is why appliances are rarely reused, as the edges on an otherwise useable appliance become easily damaged during removal.  A new set is usually required for each day.

  • Colour it well.

Once the appliance is glued down flawlessly, then the colouring is the next stage.  There are a few things that need to be considered when making up appliances that do not happen during conventional makeup.

The way colour grips skin and an appliance may differ, so ‘wiping’ colour on with a sponge is not likely to work.  Instead stippling, flicking, airbrushing or dabbing of colour is much better for prosthetics.

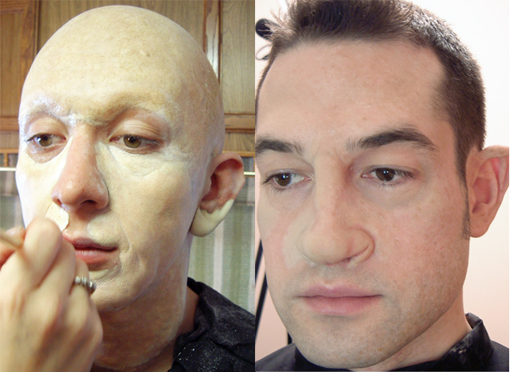
Below, you can see two makeups halfway through colouring.  The foam latex makeup on the left is much more work as foam is naturally opaque, and much of the work goes into getting a translucent effect.  The image on the right is painted only on one side so you can clearly see how the absence of a red stipple on the wolf nose is missing.
Painting edges pics

These two images show how edges are still clearly visible once applied but before colouring is complete. Image on the left was for David White (Altered States FX) and was for a commercial. The pic on the right was for a reality TV show done for Neill Gorton (Millennium FX).

Also, conventional cosmetics do not work well on appliances as they appear differently on skin that prosthetics, sometimes soaking into the appliance material and not the skin.

This is another way in which edges can be unintentionally revealed so using the right kind of makeup (PAX paints, Rubber Mask Grease Paint or  Alcohol Based colours for Silicone etc) will help prevent this issue.

  • Maintain those good edges.

Edges do not remain unchanged throughout a shooting day.  Mrs Doubtfire lied to you!

If an actor is sweating all day in action scenes, then edges will start to degrade and need maintenance pretty swiftly.  I spend most time on set watching the makeup gradually deteriorate and respond to this by eating cakes, drinking coffee and fixing them with glue on a cotton bud.  After meals there is usually a big mess to attend to – especially if someone had a pile of fried chicken for lunch and the mouth appliance is hanging off like a dogs ear in the wind.

Re-gluing, patching holes and fixing any colour which has been damaged is what you will do all day, and hopefully, the result is a makeup which looks the same on camera in every take.

Hi Def is a new issue for prosthetics for TV shows given that traditional TV images and screens were not so large and detailed.  For movies the bar was always high as close ups on a cinema screen leave little to hide behind.  Consequently, the level of attention to detail and quality given to movie projects now needs to be given to TV also.  This means working to a higher standard and maintaining best practice at all times.  You were going to do that anyway though, right?

  • Practice screwing it up, then try fixing it.

Doing this well requires the experience gained from practice, and practice remains the most crucial element to being capable in any field of expertise.  I seriously recommend slapping something on badly so you can then practice dealing with folded edges etc.

Regardless of what you learn, whatever course or workshop you attend or any book you read or Video you watch…none of the information will be retained or made relevant to you unless you perform the actions repeatedly.  Just because you know something does not mean that you can actually do it.

Document everything to ensure this is recorded so you and others – me even – can review your work honestly.  Always take photos or video if possible.  The images remain the same regardless of your fleeting emotions about how you feel towards them.

  • Use the flashing.

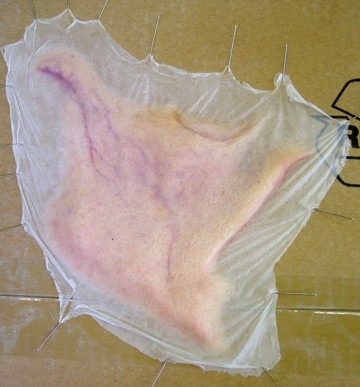
Flashing around the edge can be used to preserve the ‘live’ edge you want too use later.  This can be used to handle the appliance prior to use, and be pinned etc when pre painting etc.
Silicone prepainting using flashing pic

This image shows a silicone appliance being prepainted. Notice that the flashing extends way beyond the edge and can be used to pin the appliance to a board making it much easier to work with.

Never cut the flashing off with scissors as this creates straight lines which are rarely seen in nature or the human face.

Instead, tear the edges along the thinnest point where it should naturally create a feathered and slightly irregularly shaped edge which is easier to blend into the skin.


  • Make it soft enough.

Material softness matters, because if the appliance is stiffer than the skin it is applied to, then when the skin moves, the appliance becomes apparent as it cannot move the same way.   It is relatively easy to adjust the softness of silicone in a consistent manner but foam latex requires more experience with mixing ‘rise’ time.

Confused?  Foam is strange animal that confuses even the experienced – it can even sense your fear!

  • Last resort – fill it!

You can fill edges with a filler sometimes known as bondo or cab-o-patch.  It is made by mixing togther Pros Aide with Cab-o-Sil (Fumed Silica* – an inert filler used in many resins and other casting materials to bulk it out and thicken).

This material is then carefully applied to the areas which need to be filled, and dries clear and plexible, working with the makeup (usually foam latex or gelatine).

For silicone appliance makeups, you can also use a silicone paste such as Sculptgel or a thickened mixture of the silicone used to make the original appliances for the best colour match.

This is a last resort as it also can create a border of smooth, texture free skin which is just as noticeable as a step or thicker edge – in an ideal world you shouldn’t need it, but hey…whatever works!

*You should be able to get hold of this wherever you buy casting resins and materials.  Always read and understand the health & safety material and ensure you have adequate protection when using materials.

Creating prosthetics involves a series of procedures – each one building on the last – and each one provides fresh opportunity to damage what has been does so far.  Treat each stage with the presence of mind it deserves, and you have done all you can to get the best edge.

================================================

Well, there you go.  That is what happens when I get emailed a great question that sets my mind thinking.  Thanks Howard – that was about a week of spare time but it’s my own fault…I can’t resist!

I had a blast putting this together.  If you have any technical questions that I might be able to shed 2275 words on, please pop a comment below and email me at mail@learnprostheticmakeup.

Comments arrow pic


Seriously, I’d love to know if this was any use to you and what you think.

-Stuart

All material, images and text © Stuart Bray 2011
Posted in Uncategorized | 36 Comments

Realistic cuts using wax – video tutorial

This tutorial shows you how to create great incision effects using scar wax.

Scar wax is a great material for low budget effects, but is often used incorrectly or just simply not to it’s full potential.

One of the biggest issues is the colour that it comes in, and it suits few people in it’s original form. While it is of course possible to add makeup after application, too much will obscure the translucency of the material which is one of it’s main benefits.

This tutorial will take you through how to colour and apply it well, as well as how to deal with water based blood on a wax surface.
Thanks for checking my video!

Let me know what you think – pop a comment below.
-Stuart

Posted in Uncategorized | 8 Comments

Simple & effective scratches

I thought it would be useful to do a series of video tutorials using really basic kit to produce great makeup effects.  To that end, I have planned them and this is the first: simple & effective scratches.

As with most makeup effects, the best thing to start with is reference.  You notice that the scratched skin is snagged and dark red, but the skin around it responds to that damage and reddens shortly after the injury takes place.

My approach with casualty effects starts by looking at images of the real thing and examining the picture to simply reverse engineer what I am looking at.

Anyhow, let me know what you think below.   I love to get comments and will get stuck into the next videos asap!

-Stuart

Posted in Uncategorized | Tagged , , | 3 Comments