Mould Time! (or Mold Time if you are in the U.S.)
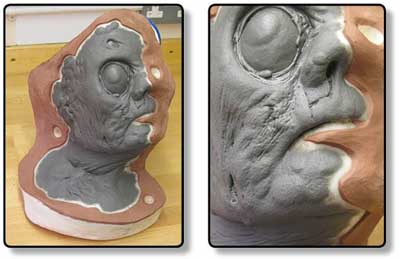
After the rapid sculpting days, last night I edged up the cutting edge and over flow as seen below. I used Chavant Le Beu Touche as it is quite a bit softer than the plastiline I used to sculpt in and it means I could crank this out a bit quicker. It took about an hour and a half to edge this fella up.
Note the three keys (the white circles in the red clay around the edge) which I cut out n a countersink bit in a drill. I tool a bit of time with a tool shaving o the edges of the keys to round them off and make sure there were no undercuts to stop the mould from coming apart…we’ll see tomorrow morning if this was indeed done correctly! Ahem. The main areas that might cause issues are the nostril and the lip, but we’ll see.

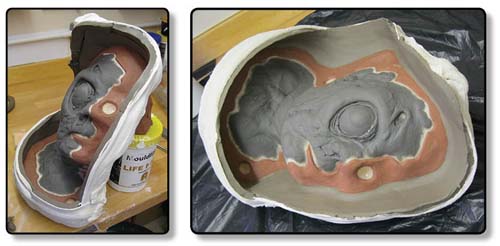
Then I made a clay wall around the edge to contain the resin while I swill the many layers that will make the mould strong enough.
The negative mould I used to make the core was kind of bowl shaped so quite easy to fill. This on the other hand is a tad convex, so swilling is trickier. It is a good idea to get some plastic on my nice workbench to stop the place from looking like the bottom of a birdcage.
Again, you can see the clay is supported by plaster bandage to keep it strong. I will be rotating this mould a lot for an hour or more, so it needs to be strong enough. Without the bandage, the clay would easily flop off and the resin would go everywhere. Then I would cry the bitter tears of disappointment which I haven’t got time to do.

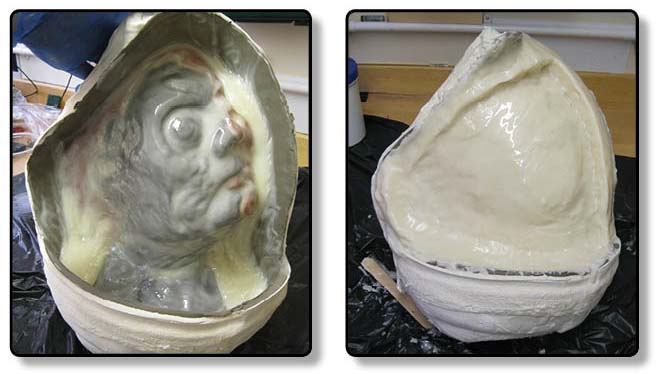
Then I give the mould a good spray with a mould wax to act as a release. This will help ensure that the resin I swill in here doesn’t bond to the resin core which is exposed around the edge of the piece (that white coastline you can see there) and the drilled keys around the edge.
Once the wax has dried (the propellant and thinner used to enable a wax to get out of the can needs to have evaporated) then I mix up a mix of resin (about 300ml) and swill everywhere carefully trying to not trap air bubbles n the deep areas (below left). Over about ten such layers, I build up a nice thickness. I allow each to set before applying the next, and it takes about an hour and a half to do all this.

The resin gets warm as it sets so I need to allow this block of plastic to cool down for a few hours until I can open it. I’m off out to watch The Iron Lady tonight and see Mark Coulier’s fab makeups in action on a big screen and I will open this mould first thing tomorrow and – fingers crossed – have some pics of a good, functioning mould to show you!
Thanks for your time!
-Stuart
All material, images and text © Stuart Bray 2012

amazing . thank you. what resin do you reccommend for these kind of moulds
I’m trying to move away from stone moulds
and advanced to fibreglass lately. but it takes ages. so I’d love to try somthing faster.
Pingback: Frankie 2 Prosthetic Mould | Learn Makeup Effects
Stuart, that is fantastic. I love the final look of the piece. Quite grotesque.
Crossing my fingers also for the de-mould. Don’t really need to though as I know you are a consummate professional. Does the resin you use work the same way as FastCast? And can fillers be added to increase it’s strength and body?
Haven’t seen TIL yet. Let us know just how excellent Mark’s work is.
Nik
Nik – It is the same thing, just a different make, and yes, over half this mould is Ali TriHydrate filler.
TIL incredible film and makeups astounding. I am so pleased that these makeups, as great as they are, are also couched among such great performances and film making. Very often brilliant work is done for a P.O.S. film, and the work never gets seen.
Here amazing prosthetic, makeup and hairwork is showcased in an incredibly well made film, and from a makeup point of view, the lingering extreme closeups leave you no doubt that this is simply brilliant, brilliant work.
No wonder the Academy needed to be assured it was makeup.
Stuart
Right it’s on my ever increasing list of films to go and see. Thanks for the review. I know you blog but have you ever thought about writing reviews as a side-line…I know not enough hours in the day and all that.
Saw Part 4, (of your prosthetic creation, not Saw IV). Lovely. Really gutted that I can’t make it down. I am in London for the week of the 20th so if you’re free for a quick drink/coffee of an evening be great to catch up.
All the best for the weekend. Stick well.
Nik
Hey Stuart It’s been a while hope your doing well mate and had a Fab start to the New Year.As awylas you awylas manage to pull one out the bag of tricks or should i say Prosthetricks,Ha bad joke i know.Awesome work again but then again couldn’t expect anything less from you.Oh i have a few suggestions may not be what you’d have in mind or way ott or completely off the track.Errrm i don’t know but how about some sort of a foot long or longer Insect Antenna on the head /forehead on the bug eyed side of the face.A few thick hair quills in random places and some kind of bug/insect type make up or pattern on the bug eyed side of the face using AA make up.With a couple of finger lenght of some kind of Arachnid type legs coming out the mouth where the mouths lop sided well thats what comes to my mind ha?Anyway i hope to make it up on the first day depending on how things go as id like a quick chat with you about something.Well i hope i get to go up and if i do i’ll pop by to say hello and have a quick chat Take Care..Keep up the astounding work Ra
Hey Stuart, very nicely done sir. If you don’t end up going for the bug look, the mnuatt is always a fan favorite, reminiscent of the Toxic Avenger from the old Troma Team productions. I definitely agree with the oozing suggestions that everyone has been posting, but maybe tint the piece with a deep purple or nice jaundiced yellow color. I wish I were able to hop a plane and make it over your way for the weekend, however it’s just not in the cards at the moment so I’ll have to settle for pictures. Keep up the great work!! Take care.
Can’t wait to see it aplied I will be at imats this weekend and definetly stop by the stand